I LOVE watching my foodie shows. Learning new cooking techniques, new recipes, and sometimes the shock factor of what other people eat! I enjoy the Food Network, but sometimes get tired of it. The Cooking Channel is not offered here (sob), so one day I found myself over at PBS. Does anyone else watch the cooking shows over there? I was in shock at how many are aired. I set my DVR to record Pati's Mexican Table, and am so glad I did! I came to find out it was her first season, and her second season is starting soon. I am going to be checking into more of the shows over at PBS now!
Pati's Mexican Table is a great show. Pati teaches you Mexican cooking, something I would truly love to learn. So, the other night when I was looking for a side dish, I remembered a simple dish she made on her show. Why not start simple? I loved it! If you haven't seen Pati's show, please check it out... and try this recipe! The only change I made to it, was to add some cilantro... Just because I love cilantro!
White Rice with Toasted Angel Hair Pasta (Source: Pati's Mexican Table)
2 cups
white rice
1/4 c. vegetable oil
1 c. angel hair pasta, broken into pieces
1/4 c. white onion, diced
1
garlic clove, minced
4 c. water or chicken broth
1 T. fresh lime juice
1 t. kosher salt
1/4 c. chopped cilantro
Soak white rice in hot water for 5 minutes. Drain, rinse with cold
water and drain again. In a cooking pot, heat the oil over medium heat
until hot, but not smoking. Add the angel hair and fry for about 2
minutes, stirring constantly. It should be browned but not burnt.
(On the show she describes the color as "tanned")
Add the drained rice, cook for 3 to 4 minutes, stirring
occasionally. Rice should reach a milky white color and it feels
and sounds heavier when you move it.
Add onion and garlic, stir and cook for another 2 minutes.
Add water or broth to the rice, add the salt and lime juice. Once it comes to a boil, reduce the heat to low, cover with the lid, and
cook for about 20 minutes.
The rice is ready when the water has been absorbed and the rice is
tender and cooked. Turn off the heat and keep it covered for at least 5
minutes. Add cilantro. Fluff with a fork and serve.
Sharing this recipe at:
Thursday's Treasures
Foodie Friends Friday
Weekend Potluck
Scrumptious Sunday's
Manic Monday
October 18, 2012
October 10, 2012
Homemade Butterfinger Bites
Butterfinger candy bars have long been one of my top five favorite candy bars. Snack size, miniatures, king size.. whatever size, you can't go wrong. A Dairy Queen Blizzard with chopped Butterfingers mixed in... heavenly! With my love for Butterfingers, I was curious about this recipe when I first stumbled across it. Could you really make a butterfinger candy bar with 3 ingredients? In my own kitchen??
Well, finally a year later, I bought the candy corn. Step one accomplished! I surfed through numerous recipes, comparing them. All very similar, just slight variations. I finally decided to go for it! I was so worried that I was throwing away a jar of peanut butter, and a bag of chocolate chips for this. No worries though... It was a complete success! All of my friends who have tried these, LOVE them. The texture is not as crisp as the candy bar, but the flavor is just amazing!
Homemade Butterfinger Bites (Inspired by Plain Chicken and The Baking Robot)
16 oz. candy corn
16 oz. creamy peanut butter
12 oz. milk chocolate chips
1 T. Shortening (optional)
Line 8”x8” pan with wax paper. Melt candy corn in microwave for one minute. Stir, and continue in 30-second intervals until melted. Stir after each interval. Stir in peanut butter.
Spread mixture into pan and cool completely. Cut into bite sizes. Trim edges if necessary.
Melt chocolate according to package instructions. If needed, add one tablespoon vegetable shortening to thin the chocolate. With fork, dip each "bite" into melted chocolate and completely cover. Place on waxed paper until set. Store in airtight container.
Enjoy :)
Sharing this at:
Thursdays Treasures
Foodie Friends Friday
Farm Girl Blog Fest
Scrumptious Sundays
Well, finally a year later, I bought the candy corn. Step one accomplished! I surfed through numerous recipes, comparing them. All very similar, just slight variations. I finally decided to go for it! I was so worried that I was throwing away a jar of peanut butter, and a bag of chocolate chips for this. No worries though... It was a complete success! All of my friends who have tried these, LOVE them. The texture is not as crisp as the candy bar, but the flavor is just amazing!
Homemade Butterfinger Bites (Inspired by Plain Chicken and The Baking Robot)
16 oz. candy corn
16 oz. creamy peanut butter
12 oz. milk chocolate chips
1 T. Shortening (optional)
Line 8”x8” pan with wax paper. Melt candy corn in microwave for one minute. Stir, and continue in 30-second intervals until melted. Stir after each interval. Stir in peanut butter.
Spread mixture into pan and cool completely. Cut into bite sizes. Trim edges if necessary.
Melt chocolate according to package instructions. If needed, add one tablespoon vegetable shortening to thin the chocolate. With fork, dip each "bite" into melted chocolate and completely cover. Place on waxed paper until set. Store in airtight container.
Enjoy :)
Sharing this at:
Thursdays Treasures
Foodie Friends Friday
Farm Girl Blog Fest
Scrumptious Sundays
October 3, 2012
Chow Mein Casserole
Hot Dish or Casserole? What are they called in your house? I have lived in several different area's of the midwest, and had to learn to change with the region on what the dish is that I am baking. In Iowa, it was always "Casserole". After moving to Minnesota, I had to switch to talking about baking a "Hot Dish". Here in Wisconsin, both terms are used. Some people believe that it has to do with the region and what the religion of the area is, meaning Catholic or other. When getting ready to post this recipe, I did a little research on this topic. On Wikipedia, their research found that a "Hotdish" is a variety of baked casserole, that in the end is mixed with a "canned soup". What do you called your baked dishes??
Now that I have all that out of the way... (I got on a little research tangent there just because I typed "Casserole" in the title of the post)... I have been so busy lately, and not feeling the greatest, so I have been counting on some of my quick and easy recipes. Some times you just don't have the energy to be in the kitchen. This recipe is like that for me. Brown the meat while the rice is cooking, throw it together, bake, done. You are ready for dinner!
Chow Mein Casserole
1 lb. ground pork ( ground chicken also works well)
1 6 oz. bag Chow Mein noodles (divided)
1 c. cashews (add more if you are like me and LOVE cashews)
1 pkt Chow Mein seasoning
1 28 oz can Chow Mein vegetables
2 c. cooked white rice
Preheat oven to 350. Prepare rice. Brown meat, drain. Prepare seasoning, following directions on packet. Add meat and vegetables to seasoning mixture. Bring to boil, and cook for 10 minutes.
In small roasting pan, layer as follows: Meat Mixture, 3/4 bag of noodles, rice, and cashews. Cover with foil, and bake for 45 minutes. Remove from oven and mix ingredients thoroughly. Serve with soy sauce, and reserved Chow Mein noodles.
Sharing this recipe at:
Thursdays Treasures
Weekend Potluck
Scrumptious Sunday
Now that I have all that out of the way... (I got on a little research tangent there just because I typed "Casserole" in the title of the post)... I have been so busy lately, and not feeling the greatest, so I have been counting on some of my quick and easy recipes. Some times you just don't have the energy to be in the kitchen. This recipe is like that for me. Brown the meat while the rice is cooking, throw it together, bake, done. You are ready for dinner!
Chow Mein Casserole
1 lb. ground pork ( ground chicken also works well)
1 6 oz. bag Chow Mein noodles (divided)
1 c. cashews (add more if you are like me and LOVE cashews)
1 pkt Chow Mein seasoning
1 28 oz can Chow Mein vegetables
2 c. cooked white rice
Preheat oven to 350. Prepare rice. Brown meat, drain. Prepare seasoning, following directions on packet. Add meat and vegetables to seasoning mixture. Bring to boil, and cook for 10 minutes.
In small roasting pan, layer as follows: Meat Mixture, 3/4 bag of noodles, rice, and cashews. Cover with foil, and bake for 45 minutes. Remove from oven and mix ingredients thoroughly. Serve with soy sauce, and reserved Chow Mein noodles.
Sharing this recipe at:
Thursdays Treasures
Weekend Potluck
Scrumptious Sunday
September 23, 2012
Gram's Buttermilk Pancakes
One risk I have run into with raising our own chickens, is serving eggs to often for breakfast! Truckin' Man is pretty good at letting me know when he needs a change up in our menu plan! Today, was one of those days. He wanted pancakes, so I got out my Grandma's recipe for Buttermilk Pancakes. She gave me this recipe about a year ago when I was complaining about always being out of pancake mix when the mood struck to make them. I haven't bought a mix since.
These are so simple, you don't need a box mix. Don't have buttermilk on hand? You can make a buttermilk substitute in just 5 minutes with milk and vinegar or lemon juice!
Grams' Buttermilk Pancakes
2 c. flour
1 t. baking soda
2 t. baking powder
1 t. salt
2 eggs
2 c. buttermilk**
Mix dry ingredients. Add eggs and buttermilk to dry mix. Mix until combined,there may be a few lumps.
Bake on hot griddle.
Buttermilk Substitute: For two cup of buttermilk, add two tablespoon of vinegar or lemon juice to a liquid measure cup. Fill cup to equal two cups, with milk. Let set for 5-10 minutes. Add to recipe as needed.
Sharing this recipe at:
Thursdays Treasures
Weekend Potluck
Farm Girl Friday
Clever Chick's Blog Hop

These are so simple, you don't need a box mix. Don't have buttermilk on hand? You can make a buttermilk substitute in just 5 minutes with milk and vinegar or lemon juice!
Grams' Buttermilk Pancakes
2 c. flour
1 t. baking soda
2 t. baking powder
1 t. salt
2 eggs
2 c. buttermilk**
Mix dry ingredients. Add eggs and buttermilk to dry mix. Mix until combined,there may be a few lumps.
Bake on hot griddle.
Buttermilk Substitute: For two cup of buttermilk, add two tablespoon of vinegar or lemon juice to a liquid measure cup. Fill cup to equal two cups, with milk. Let set for 5-10 minutes. Add to recipe as needed.
Sharing this recipe at:
Thursdays Treasures
Weekend Potluck
Farm Girl Friday
Clever Chick's Blog Hop
September 18, 2012
Three Pepper Pasta Salad
Where has the summer gone? It seems to have flown by, and I know that fall is approaching as we were below 40 degree's last night! I am looking forward to our first frost. It has been near all I can handle to keep up with the vegetable garden, the flower garden, working... Where is my time to cook, bake and have fun in the kitchen??
With how busy things have been, I have been getting by on quick and easy recipes. I LOVE pasta salads. As much as I hate to admit it, I do like the Suddenly Salads that come in the box. The seasoning blend they use is just a favorite of mine. My Three Pepper Pasta Salad uses a mix, but you can add your own fresh peppers. Since, I use Penne Pasta for this salad, I cut my ingredients to match. Kind of like a thick julienne cut. My mom just laughs at this salad (and other dishes I make) since I like to keep my ingredients in similar shapes. I don't deny having my "issues", I can't be the only one that likes their food shapes to match.... Can I??? Tell me yours!
Three Pepper Pasta Salad
13 oz. box Penne Pasta
1 - 1 oz. package Hidden Valley Ranch Salad Dressing Mix
1/2 c. water
1/2 c. olive oil
1 medium size green bell pepper
1 medium size red bell pepper
1 medium size yellow bell pepper
1 medium red onion
6 oz. cheddar cheese.
1 - 1 oz. package Hidden Valley Ranch Salad Dressing Mix
1/2 c. water
1/2 c. olive oil
1 medium size green bell pepper
1 medium size red bell pepper
1 medium size yellow bell pepper
1 medium red onion
6 oz. cheddar cheese.
Directions
Cook pasta according to directions on box. Meanwhile, in small bowl, mix dressing mix together with water and oil. Combine well, and set aside.
Cut peppers, onion and cheddar cheese into thick julienne strips.
Rinse pasta in cold water. Add dressing and toss together until thoroughly combined. Add vegetables and cheese. Toss lightly. Add additional olive oil, if needed.
Let chill for 4 hours. Serve and enjoy!
Printable Recipe Here
Sharing this recipe @:
Thursdays Treasures
Let chill for 4 hours. Serve and enjoy!
Printable Recipe Here
Sharing this recipe @:
Thursdays Treasures
September 16, 2012
Farm Fresh Eggs
It is so hard to believe that today is the 6 month anniversary of when I brought our little fuzzy baby chicks home! Where does the time go?!?! We went from the cute fuzzy chicks, to the ugly dorky stage, to beautiful birds that have become pets for us. I am going to skip over the part of the 6 chickens we raised for butchering, for now. Still not sure how I feel about that ordeal, and if I will do that again.
We have 6 ladies with us still that are laying perfect eggs daily. On a normal day we are up to 5 eggs. One of the ladies, "Crooked Comb", is still struggling with laying and doesn't always get us up to the grand total of 6 eggs.
Even before getting our own hens, I had been eating farm fresh eggs for some time. I couldn't even remember what a "store" egg was like, so my parents brought one over for me. I finally got to do an appearance and taste test. Sad part of that is that I had let my parents run out of eggs. . . I shouldn't have let that happen!
See how the yolk on the left is more orange? That's from my ladies and thanks to the great diet they eat!
As far as the taste test, what I found was that the egg, fresh from my ladies, had flavor.
In comparison, the store egg really didn't have any flavor. At all.
It really did make me feel that what we have done raising our own chickens is worth while and we are getting a better egg for the work! And bonus... I have egg customers! Only 3, but that is really an ideal number of customers for how many eggs we get.
The only disadvantage I have found to fresh eggs is hard boiling them. They are hideous in appearance after you boil them! When I would try peeling them, at least 1/8" inch of the white would come off with the shell. After a lot of research, there are many tips for getting your eggs to turn out. I just tried one for the egg's I had planned on making this weekend. I had to let them age. So, I pushed a dozen to the back of the fridge for 3 weeks and forgot about them. I boiled them last night and thankfully they turned out beautifully! I had my fingers crossed on this one since they were destined to become deviled egg's for a potluck today, and everything was a success.
Sharing this at Farm Girl Friday
September 3, 2012
Hoarders - Vegetable Hoarders, that is!
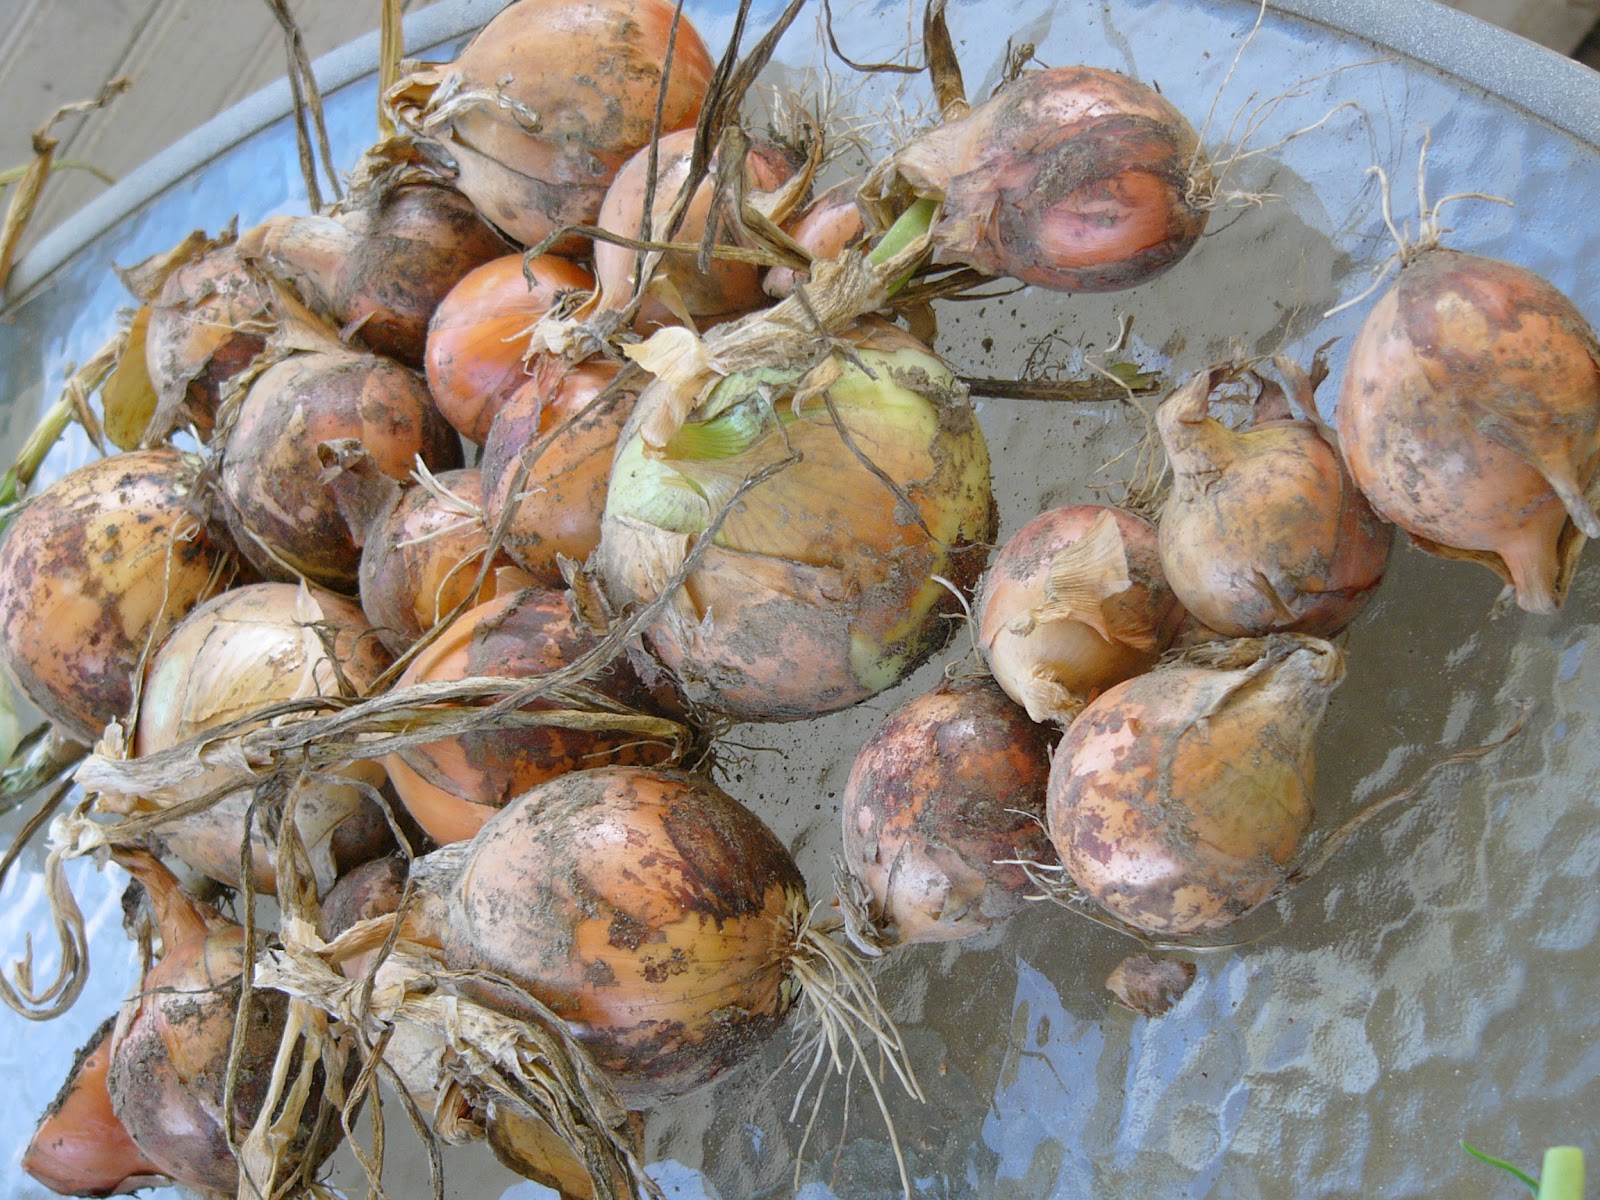
I am finally feeling that the garden is starting to slow down a little tiny bit, but it is still producing more than I can keep up with! Sweet Corn is done. . . Yeay! It really didn't do well, but considering the poor growing conditions this year, I can't complain. We had plenty to eat, as well as some put away to enjoy later this year. I have harvested all of the onions. They did soo poorly this year, I am disappointed. I will have enough to get half way through the winter, if I am lucky. I can't get an accurate count, since I picked some during the growing season to go directly into dishes and salads, but my guess is that only 50% grew. Only a handful made it to the nice baseball size. On the plus side, what I am lacking in quantity, I made up for in quality! They are delicious!
The stars of the shows... Walla Walla. Biggest in size and super sweet!
The Candy Cane's pulled through in 2nd place.
The Texas 1015's apparently did not like my growing conditions :(
Still plenty of other veggies to keep me busy.
I am begging to feel like we are hoarders, of vegetables anyway!
Lessons learned this year:
#1 Stay on top of the weeds! I was spending so much time watering, I let the weeds go. I am so paying for that choice now. But overall, I suppose the watering was the best use of my time.
#2 Just because you are offered tons of free broccoli, cauliflower, and cabbage plants in the spring, you do not have to accept them all, let alone plant them all!
#3 No matter how amazing it is to watch your pumpkin vines spread everywhere . . . cut some of them off so that they do not monopolize your garden.
Subscribe to:
Posts (Atom)